Want your blog posts to rank on Google and keep readers hooked?
Learn the art of blending strategic planning, keyword mastery, and engaging storytelling to craft content that drives real results.
Creating an engaging and effective blog post isn’t just about putting words on a page. It involves careful planning, strategic research, and thoughtful execution.
Whether you want to establish your authority, improve SEO, or connect with your audience, here’s a step-by-step guide to writing a blog post that delivers results.
So buckle up!
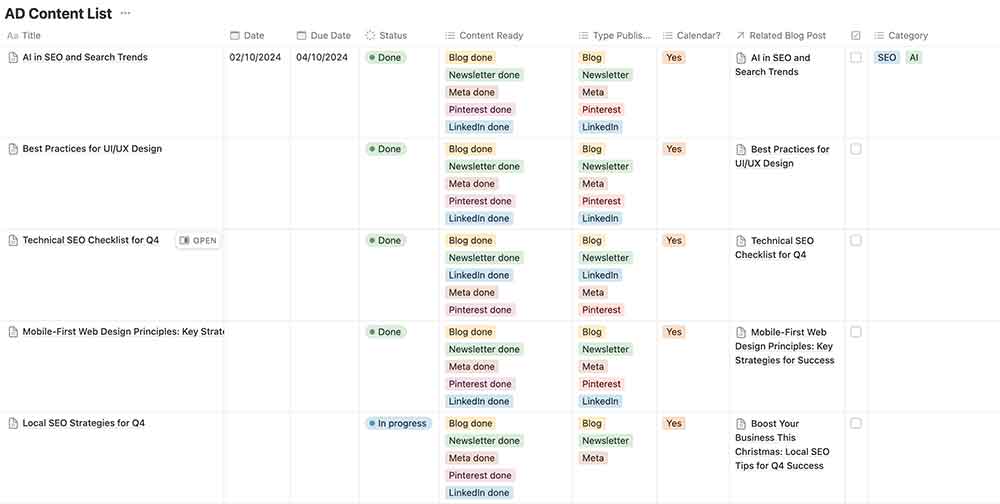
Step 1: Prepare a Content Calendar
Start here because a clear content calendar keeps you focused, consistent, and always a step ahead of the competition.
Consistency and strategy are key to successful content marketing, and a well-structured content calendar helps you achieve both.
It ensures you publish regularly, align content with business goals, and build topical authority in your niche.

Steps to Create a Content Calendar
Define Your Goals:
- Are you aiming to increase traffic, generate leads, or boost brand authority? Your content should align with these goals.
For instance, lead generation may involve downloadable guides or CTAs to your service pages.
- Are you aiming to increase traffic, generate leads, or boost brand authority? Your content should align with these goals.
Identify Key Themes:
- Establish overarching themes for your niche. Examples:
- Jewellery: Buying guides, styling tips, and care tips.
- Interior Design: Room makeovers, seasonal design trends, and DIY advice.
- SaaS: Productivity hacks, tutorials, and case studies.
- Establish overarching themes for your niche. Examples:
Plan Around Events and Trends:
- Use key dates like holidays, seasonal shifts, or industry milestones. For example:
- Jewellery: Valentine’s Day or wedding season.
- Interior Design: Spring cleaning or holiday decor.
- SaaS: End-of-year budget planning or seasonal rush prep.
- Use key dates like holidays, seasonal shifts, or industry milestones. For example:
Balance Content Types:
- Diversify your content to cater to various audience needs:
- Educational Content: How-to guides, FAQs, and care tips.
- Inspirational Content: Lookbooks, case studies, or styling ideas.
- Promotional Content: Gift guides, sale announcements, or product launches.
- Diversify your content to cater to various audience needs:
Build Topical Authority:
- Identify pillar topics that showcase your expertise and create content clusters around them. For example:
- A jewellery site could have a cluster on “Engagement Rings,” with posts like “How to Choose the Perfect Ring” and “Engagement Ring Trends.”
- Interlink related-posts and link to service or product pages.
- Identify pillar topics that showcase your expertise and create content clusters around them. For example:
Organise and Schedule:
- Use tools like Google Sheets, Notion, Trello, or specialised planners to map out your calendar.
- Include 1–2 months of planned content to allow time for research, writing, and optimisation.
Examples of Content Calendars for Different Industries
Here’s how this process applies to specific industries:
1. Jewellery E-Commerce Store
Themes: Buying Guides, Styling Tips, Jewellery Care
- Valentine’s Day (February):
- Blog Post: “Top 10 Romantic Jewellery Gifts for Valentine’s Day” → Link to product pages for heart-shaped pendants or diamond earrings.
- Related Blog: “How to Write the Perfect Love Note for Your Jewellery Gift” → Interlink with the Valentine’s blog and related products.
- Wedding Season (June–August):
- Blog Post: “How to Choose the Perfect Bridal Jewellery” → Link to the bridal jewellery category.
- FAQ: “What Is the Best Metal for Wedding Bands?” → Link to gold, platinum, and silver categories.
2. Interior Design Business
Themes: Room Makeovers, Seasonal Design Trends, DIY Tips
- Spring Cleaning (March):
- Blog Post: “10 Interior Design Tips to Freshen Up Your Home This Spring” → Link to your consultation services and showcase a recent project.
- Related Blog: “5 Small Changes to Make Your Living Room Feel New Again” → Link to an FAQ page about working with an interior designer.
- Holiday Prep (November–December):
- Blog Post: “How to Style Your Home for the Holidays” → Link to “Holiday Dining Room Design Inspiration” and promote your seasonal consultation package.
3. Software as a Service (SaaS) for Small Businesses (e.g., Online Booking Software)
Themes: Productivity, Tutorials, Seasonal Campaigns
Salon and Spa (January):
- Blog Post: “How Online Booking Software Can Boost Your Salon’s New Year Bookings” → Link to a case study page and your features overview.
- Related Blog: “Top Features Every Salon Owner Needs in a Booking System” → Interlink with tutorials on setting up reminders or managing double bookings.
Seasonal Campaigns (Back-to-School, Summer):
- Blog Post: “5 Ways to Prepare Your Business for the Seasonal Rush with Online Bookings” → Link to product pages and customer testimonials.

Step 2: Choose the Right Keywords
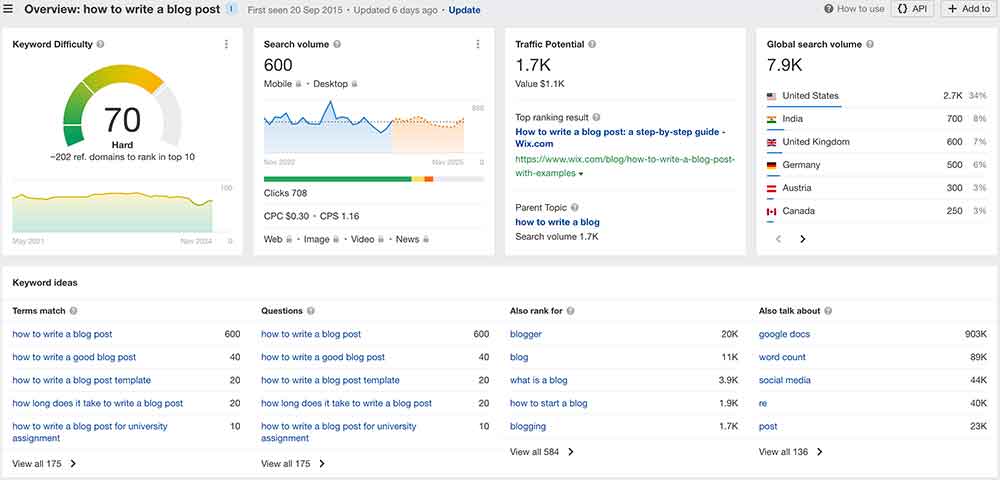
Selecting the right keywords is the foundation of a successful blog post. Use tools like Google Keyword Planner, Ahrefs, or SEMrush to find terms your audience is searching for. Don’t forget:
- Focus Keywords: The primary phrase you want to rank for.
- Long-Tail Keywords: Specific, lower-competition phrases that often have higher conversion potential.
- Semantically Related Keywords: Terms closely related to your main keyword to improve content depth and SEO.
If you prefer free tools, you can try:
- Ubersuggest: Provides keyword ideas, search volume, and SEO difficulty metrics. It’s user-friendly and great for beginners.
- Keywords Everywhere (opens in a new tab): A browser extension that displays keyword metrics directly within Google search results, giving you insights into search volume, CPC, and competition without switching tools.
For more detailed guidance, check out our comprehensive post on how to do keyword research.

Step 3: Define the Tone of Voice and Target Audience
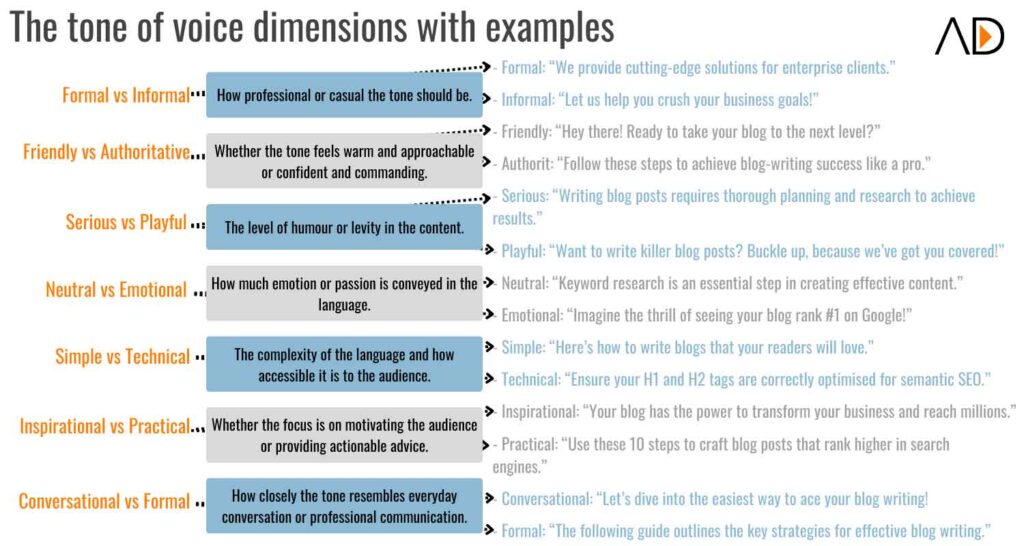
Your blog post should resonate with your audience, and the tone of voice plays a critical role in achieving this. To get it right:
Identify Your Target Audience’s Needs and Challenges: Understand who you’re writing for. What are their pain points, aspirations, and questions? Knowing your audience helps you create content that feels personal and relevant.
Decide on a Tone of Voice That Resonates: The tone should match your audience’s expectations and preferences. Consider:
- Formal and Professional: Suitable for industries like law, finance, or SaaS targeting C-level executives.
- Conversational and Friendly: Ideal for lifestyle blogs, small business owners, or B2C content.
- Authoritative and Data-Driven: Preferred by tech-savvy audiences or readers seeking in-depth analysis.
Address Pain Points with Actionable Solutions: Show empathy for your audience’s challenges and provide clear, actionable advice. This builds trust and demonstrates your expertise.
Example:
A SaaS audience might expect a data-driven tone with charts, statistics, and expert commentary to support your points.
In contrast, a lifestyle blog could lean towards a conversational and approachable style with relatable anecdotes and casual language.
The key is ensuring the tone of voice resonates with the target audience, fostering connection and credibility.
Step 4: Analyse Competitors
Before drafting your post, analyze your competitors to understand what works and where gaps exist:
- Use incognito mode to search for your focus keyword. This prevents personalised results from skewing your perspective.
- Check the top-ranking articles for:
- Word count
- Structure and headings
- Use of visuals or data
- Readability and tone
- Identify opportunities to add value—whether it’s by updating outdated info, adding unique insights, or addressing unanswered questions.

Step 5: Create a Detailed Outline
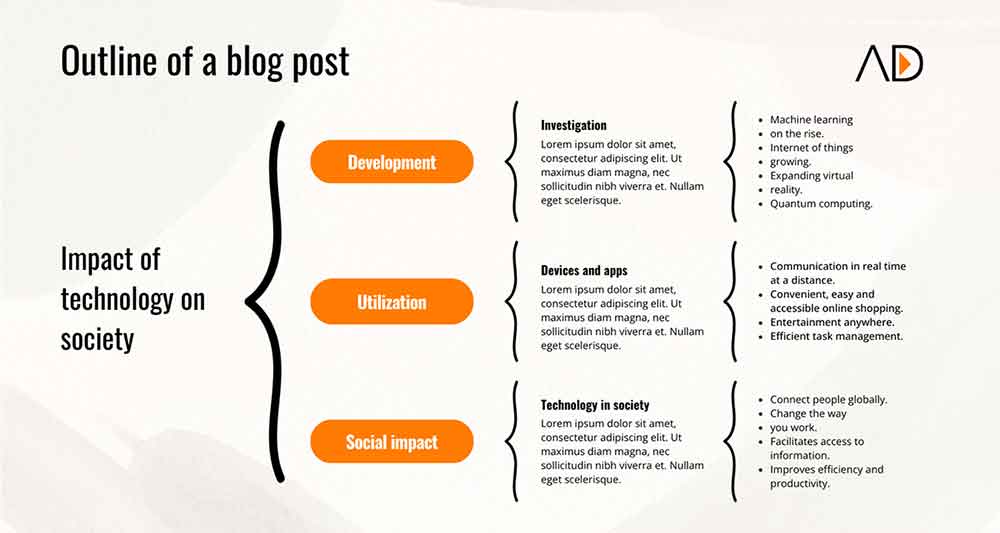
An outline keeps your writing organized and ensures you don’t stray off-topic. A good blog post outline should include:
- Introduction: Hook readers with a problem, question, or compelling statistic.
- Main Body:
- Break down the topic into subheadings (use H2 and H3 tags for SEO).
- Address key points with actionable insights.
- Incorporate relevant keywords and semantic terms naturally.
- Conclusion: Summarize the post and provide a clear call to action (CTA).
Step 6: Write the Blog Post (With No Fluff)
When it’s time to write, focus on delivering value. Every sentence should serve a purpose—whether it’s informing, inspiring, or engaging your reader.
Avoid padding your blog with unnecessary content, as readers will quickly lose interest. Here’s how to craft a high-quality, impactful blog post:
Best Practices for Writing an Effective Blog Post
Start with a Strong Hook:
- The first sentence should grab attention immediately.
- Use a surprising statistic, a thought-provoking question, or a compelling statement to draw readers in.
Get to the Point Quickly:
- Don’t bury your main message under layers of introduction.
- State the key idea early and then expand on it in the body of the blog.
Organise with Clear Headings:
- Use H2s and H3s to divide your post into easily digestible sections.
- Headings should be descriptive and tell the reader exactly what to expect in each section.
Use Short Paragraphs:
- Stick to 2-3 sentences per paragraph for better readability.
- This is especially important for mobile readers, where long paragraphs can feel overwhelming.
Bullet Points and Lists Are Your Friends:
- Use them to break down complex ideas or provide quick tips.
- For example, if listing tools, use bullet points to keep it clean and scannable.
Add Examples and Analogies:
- Support your points with real-life examples or relatable analogies.
- For instance, when talking about keyword research, show a screenshot or explain how it works step-by-step.
Keep Your Sentences Simple:
- Avoid overly complex or jargon-filled sentences.
- Write as if you’re explaining the topic to someone with minimal background knowledge.
Write for Your Target Audience:
- Tailor your tone, vocabulary, and depth of explanation to the intended readers.
- A SaaS audience may prefer data and technical explanations, while a lifestyle audience might appreciate storytelling.
Incorporate Visual Breaks:
- Add images, charts, or graphics to break up walls of text.
- Visuals also enhance understanding and make your post more engaging.
End with a Clear Call-to-Action (CTA):
- Direct readers to take the next step, whether it’s downloading a resource, subscribing to your newsletter, or contacting your business.
- Example: “Ready to create blog posts that rank? Contact us today for expert help!”
Word Count Guidance
- While the ideal word count depends on your topic and audience, most in-depth posts range from 1,200–2,000 words.
- However, cornerstone content or highly competitive topics may require 3,000–6,000 words. Check competitors’ blogs to gauge how comprehensive your post needs to be.
What to Avoid
- Fluff and Redundancy: Don’t add sentences just to increase word count. Every word should add value.
- Overloading with Keywords: Write naturally, weaving in keywords where they fit organically.
- Unnecessary Complexity: Keep the language clear and easy to follow, even for technical topics.
Key Writing Tools
- Use Grammarly or Hemingway Editor to improve readability and polish your grammar.
- Try Google Docs or Notion to organise your drafts and collaborate with others.
- Check for plagiarism and originality with tools like Copyscape.
Step 7: Incorporate Engaging Media
Media plays a crucial role in elevating the quality and impact of your blog posts. Visual elements such as images, videos, infographics, and graphics not only make your content more engaging but also help communicate complex ideas effectively. Here’s how you can incorporate media to enhance your blog post:
Why Media Matters
- Boosts Engagement: Visuals capture attention faster and keep readers on the page longer.
- Clarifies Complex Concepts: Infographics, charts, and screenshots make difficult topics easier to understand.
- Increases Shareability: Blog posts with rich media are more likely to be shared on social platforms.
- Improves SEO: Optimised media contributes to search engine rankings, especially through alt text, captions, and image file names.
Types of Media to Use
- Images
- Use high-quality, relevant images to break up text and visually support your points.
- Example: Include images of a content calendar or keyword research tools in your blog.
- Screenshots
- Great for tutorials or step-by-step guides. Highlight features of tools like Google Keyword Planner or Trello for clarity.
- Use annotations to focus attention on specific areas.
- Infographics
- Summarise data or processes in a visually compelling way. For instance, an infographic on the “Steps to Write a Blog Post” can serve as a shareable takeaway.
- Videos
- Embed short tutorials, interviews, or explainer videos to add depth to your content.
- Example: A video showing how to draft a content calendar or format a blog post.
- Graphics or Diagrams
- Use flowcharts, Venn diagrams, or custom illustrations to visually explain relationships or processes.
- Example: A diagram showing the connection between keywords, content, and SEO performance.
- Interactive Media
- If possible, include elements like quizzes, sliders, or clickable charts to engage users more actively.
Don’t Forget to Optimise Your Media
- File Size: Compress images and videos to avoid slowing down your page load speed.
- Alt Text: Write descriptive alt text for every image to improve accessibility and SEO.
- File Names: Use keyword-rich, descriptive file names (e.g., “how-to-write-a-blog-post-steps.png”).
- Captions: Add captions where necessary to provide context or improve engagement.
- Video Hosting: Host videos on platforms like YouTube or Vimeo and embed them for faster loading.
Step 8: Optimise for SEO
Once the draft is complete, optimize it for search engines:
- Include the focus keyword in the title, meta description, first 100 words, and headings.
- Use alt text for images.
- Link to high-quality internal and external resources.
- Add a compelling meta description to improve click-through rates.
- Think about the semantically related words and phrases to your target keyword and make sure you involve them in your post.
Step 9: Review, Edit, and Publish
Before publishing, review your post thoroughly:
- Proofread for typos and readability.
- Ensure formatting is consistent and visually appealing.
- Verify that all links work and images load correctly.
Finally, hit publish and promote your blog across social media and email newsletters for maximum reach.
Step 10: Promote Your Blog Post
Writing a great blog post is just the beginning. To ensure your hard work reaches the right audience, you need a strong promotion strategy.
Here’s how you can effectively promote your blog post and maximise its impact:
How to Promote Your Blog Post
Share on Social Media:
- Post your blog on platforms where your target audience is active (e.g., LinkedIn, Facebook, Instagram, Twitter).
- Tailor your captions for each platform. For example:
- LinkedIn: Focus on professional value.
- Instagram: Use an eye-catching image and engaging hashtags.
- Schedule multiple posts over time to keep the blog visible.
Send to Your Email List:
- Include your blog post in a newsletter or as a standalone email to your subscribers.
- Highlight the key takeaways and include a strong call-to-action to encourage readers to share or comment.
Leverage Online Communities:
- Share your blog in relevant groups, forums, or communities like Reddit, Quora, or industry-specific Slack channels.
- Add value to the discussion by explaining how your post solves a specific problem.
Collaborate with Influencers or Partners:
- Ask influencers or industry experts to share your post if it provides value to their audience.
- Cross-promote with partners or affiliates if your content aligns with their audience’s needs.
Boost Visibility with Paid Ads:
- Use platforms like Facebook Ads, LinkedIn Ads, or Google Ads to promote your post to a broader audience.
- Focus on targeting specific demographics or interests for maximum ROI.
Repurpose Content:
- Turn your blog post into different formats, such as:
- Infographics for Pinterest.
- Short videos for Instagram or TikTok.
- A slide deck for LinkedIn or SlideShare.
- A downloadable PDF or checklist as a lead magnet.
- Turn your blog post into different formats, such as:
Internal Linking:
- Link your new blog post to older, relevant posts on your site to drive internal traffic.
- Add links to the new blog post from popular pages on your website.
Track and Optimise:
- Use analytics tools (e.g., Google Analytics, UTM parameters) to monitor the performance of your blog post.
- Evaluate traffic sources, bounce rates, and social shares to adjust your strategy for future posts.
You are good to go 🙂
Writing a blog post that ranks and resonates takes effort, but following this structured process will make it easier to deliver consistent, high-quality content.
If you’d rather focus on your business while experts handle the blogging, explore Aksel Digital’s content marketing services to supercharge your strategy.
Happy writing!
Free Download
Download Free Keyword Map Template
To make this process easier, download our free Keyword Map Template to start organising your keywords effectively. This template will help you map out your keywords, assign them to the right pages, and track your progress as you optimise your site.
Author Spotlight
Ozlem "Oz" Aksel Basboga
Lead Digital and SEO Strategist
Oz leads digital strategy at Aksel Digital, specialising in SEO, content, and brand growth. With a background in architecture and marketing, she combines creativity with analytics to deliver results.
Oz lives in London with her family and their cat. A nature lover and avid runner, she fuels her day with black coffee and big ideas.


